One of the great things about hand made beer is that there are some by-products.
The top one for anyone who uses specialty grain or is an all grain brewer is of course spent grain. Specialty grains draining in a strainer.
Afterwards, a lot of brewers throw it out, others use it for mulch in the garden.
But I'm weird. I bake bread with it.
 Close up of spent grain.
Have a look back here for the basic bread recipe: http://yeastygoodness.blogspot.com/2009/03/simple-linseed-and-oat-loaf.html. Use that recipe, but leave out the linseed grain and the rolled oats.
How much spent grain is needed? About 100 grams or a big breakfast bowl worth will be enough for one loaf. Find some inventive way to use the remaining grain.
It's necessary to add more olive oil to this recipe to help keep the bread moist a little longer. Very grainy loaves tend to become stale a bit faster than plain old white bread.
After adding the first cup of water, it's spent grain time. Add about three or four heaped tablespoons into your machine. Let it mix through the half-wet flour very well and add water a little at a time until the dough balls stands up and begins to be kneaded. There is residual water in the grain, so expect the dough to become too wet. To fix that, add flour one tablespoon at a time and wait a moment until it is taken up. You will get a feel for this as you go.
Proofing and second rising are just the same as with any other loaf. Dough after proofing.
 Decorated loaf before baking.
 Done!
Done!
 Lovely colour, tastes great.
Happy Baking!!
For a blog that's all about yeasty goodness, there hasn't been a whole lot of talk about yeast.
So, let's talk about yeast.
Baking yeast is interesting enough, but I can't say that I'm very deep into it at the moment so let's talk about brewer's yeast.
Beer making is simple enough at first glance. It's water, hops, malt and yeast. What does yeast do?
Simply, it makes carbon dioxide and ethanol as two of its important by-products. The carbon dioxide is what gives us the bubbles in our beer and the ethanol is the alcoholic goodness which we all know and love. There are other by-products but they're beyond the scope of this post.
In brewing, yeast goes through a couple of major stages. The first stage is where is consumes as much of the oxygen present in the wort so that it can reproduce. When the oxygen runs out, the yeast commences producing alcohol.
There are literally thousands of yeasts from many suppliers that are used in hand made beer and commercial beer alike. Some for the hobbyist are close copies of famous commercial yeasts used in your favourite off the shelf beer. Some are the real yeast used by your favourite brewery.
There are two main groups of yeasts:
Dry yeasts are made by a spray drying process, among others. Basically a solution of live yeast is made at the factory, which is then sprayed as fine droplets and dried by a variety of processes. The dried yeast is then coated in a nutrient or other material to ensure freshness and then packed into individual sealed foil pouches.
Liquid yeast on the other hand is the liquid from which the dried yeast is made. "What's the difference?" you ask.
The difference is that the dry yeast is more stable over a longer period of storage and can tolerate a reasonable amount of mishandling and still produce a good result. Ideally, if they are kept in the fridge and then warmed up to room temperature a few hours before use you will have a good result.
Liquid yeasts need to be temperature controlled (cool) in order to keep the yeast alive and have a shorter 'use by date' of about six months from when they leave the factory. These liquid yeasts come in a variety of packaging, but the most common is the plastic screw-top vial, much like this one: 
Similarly, liquid yeasts need to be warmed to room temperature before use. Check the manufacturer's instructions on the pack.
The other difference is price. A packet of dry yeast is about $4 - $5. A vial of liquid yeast is about $15 - 18. Worth it? I say yes.
If you buy kit beer, it usually comes with a package of yeast under the lid. For all intents and purposes, it's OK but it won't give you the best beery result for a variety of reasons. If the kit is from a reputable maker such as Coopers (http://www.coopers.com.au/homebrew) or Morgans (http://www.morgansbrewing.com.au/products.asp?range=Overview), chances are that the yeast which it came with is pretty good, but through non-optimal handling it may not be in the best condition to give you a top grade result. They're good yeasts and able to withstand the kind of abuse someone new to brewing can dish out, purely through not knowing enough. In the hands of an experienced brewer they can be used to produce a rather pleasant every-day beer.
You've put your money on the table, bought your kit and bits or taken that next step to all-malt extract brewing and want to make your result shine. After all, by this stage you're after quality and not just a buzz. The buzz is a nice side effect. 
That's where after-market yeasts come into play.
The most common stepping stone from the original kit yeast is to one of the Fermentis dry packet yeasts. A couple of the most popular are S-04 and S-05.
S-04 is styled after an English ale yeast. It produces a lovely result with some residual sweetness, much like a real English Ale such as a Best Bitter or a Special Bitter and the like. It tends to enhance the malt aspects of the flavour profile. It's really easy to use and very reliable and economical. I'll tell you something to make it even more economical a little later in this article.
S-05 is an American style yeast, producing a result that is more dry and tends to make the hops a little brighter and more forward in the flavour profile. Great for making something like the famous Anchor Steam Beer and similar.
Dry packet yeasts are very easy to use and rather predictable in how they do what they do. You can either just sprinkle them into the wort and let them do their thing or you can rehydrate and feed them a little to get the action started a little sooner.
Naturally enough, Fermentis has a massive range of yeasts which are suited to a very diverse range of applications and therefore flavour profiles, fermentation characteristics and more. We can get more into what kind of yeast does what in another article.
If you want to go a little further in quality, then it's liquid yeast time for you. I'm certainly not going to go through the White Labs or Wyeast list with you one by one - I'm just going to mention a couple which I have used and found interesting and that give a great result.
My new favourite for making English ales is WLP002 English Ale Yeast. There are some others for making English ales from White Labs which have slightly different characters. However, WLP002 is a good starting point. It's an aggressively flocculating yeast. This means that it clings together and drops out of solution very quickly when it has nothing to do, or starts to feel lazy. To get around this, you need to give the fermenter a rock just to get it off the bottom and keep it doing its good work. The end result is a beer that looks rather clear, almost like commercial filtered product and has a truly traditional flavour.
Another one which caught my eye and I used for my 'Froehlichen Kirschenbier' (Cheery Cherry beer) is WLP550 Belgian Ale Yeast. I had been buying various Belgian beers at local shops at up to $9 for a 300 to 330 ml bottle - far too expensive to enjoy a few every evening. This yeast was the solution to that problem and wow did it deliver! It's a rather highly attenuating yeast. In other words, if you start out with a high specific gravity it will finish with a low specific gravity. It takes about ten days to ferment at around 18C, but it's certainly worth it. I hear that a little extra heat towards the end of the fermentation, say 22C, helps bring out some of that Belgian funky character to make a truly distinguished and authentic drop. Highly recommended.
One of the other gents I know who brews is a huge fan of Nottingham Ale Yeast (available as WLP039 from White Labs) . He tells me that it's a very fast fermenting and aggressive yeast. Some yeasts politely stay in the fermenter and do their work. Notto goes mad and works hot, up to four or five degrees celcius above ambient temperature. If you're into ESB then this is the beastie you need.
Take a look around the Fermentis site (http://www.fermentis.com) and White Labs site (http://www.whitelabs.com) for more information and to see their outstanding ranges of yeast.
Here's the hot tip I promised earlier: How to make yeast costs lower.
- Choose a yeast and ferment as usual.
- Bottle or keg as usual, leaving the yeast cake in the bottom of the fermenter.
- Collect a cup of yeast in a sanitised container.
- Add around 300 ml of water at around 27C and about 10 - 20 grams of sugar (I prefer dextrose, but others are OK)
- Stir well with a sanitised spoon.
- Cover with cling wrap.
- Prepare your next wort, clean your fermenter.
- Wort into the fermenter, dilute to volume.
- Measure OG.
- Add the yeast which you've collected, fed and watered.
- Stir powerfully to get as much air into the wort as possible.
- Ferment as normal.
You can do this about five or six times before the yeast ceases to be viable or begins to cause problems.
There are more advanced yeast farming techniques but I won't go into those at this time. This is the quickest, easiest, least expensive and least equipment intensive method to get more value for your yeast money.
Happy Brewing!
Yes, you read correctly - Indonesian style beef jerky.
First, a little legal stuff: Making jerky from any meat can be dangerous to your health if it is not prepared, cooked and stored correctly. Do not make jerky unless you are absolutely certain that you know what you are doing and even then you should do it in consultation with someone who has done it before and knows what they are doing. I will give this warning only once, being this time. For all future recipes I will give only the marinade recipe and leave it up to you to decide how to cook the jerky. You elect to make it by your own free will and therefore the results are because of your efforts alone. I am not liable in any way, shape or form for your illness or death or any event related to this blog entry or any other I may make anywhere at any time.
That said, let's have some fun!
Beef jerky is one of those things that you either love or hate. Being a brewer and therefore a beer drinker I love some snacks to eat with my brew on the balcony of an evening. Beef jerky and pork jerky are just two of my favourite brew foods. I will teach you some more types later.
What's beef jerky? Easy - it's dried thin slices of beef. Sometimes it's plain with just a little salt and pepper, other times it is flavoured with herbs, spices and all kinds of amazing, interesting and tasty things.
As far as cost goes, it's a slightly expensive snack because the finished product is around one-seventh of the weight of the original piece of meat you started with. Most of that loss is because of the drying process - in other words, the weight is lost to evaporated water. However, if you consider that around 30 grams of beef jerky costs AUD$7 or more, then taking a twelve dollar 1.5 kilo slab of corned silverside and turning it into jerky you will end up with at least 200 to 275 grams of top grade product. Money saved and a happy mouth!
When I first made it, I thought it was really difficult and was somewhat scared. It's really easy, but you need to put two good ground rules in place:
* You must dry the meat at over 80C and less than 85C for more than two hours as part of the drying process and
* You must trim as much fat and sinew as possible.
Why? The 80C for two hours part is about killing off as many bad bacteria and other microbes that may be present. These non-beneficial organisms will either make you very sick, possibly dead or make the jerky spoil.
For this reason, I dry at 80C for the duration of the process. Despite jerky being able to be stored without refrigeration I prefer to refrigerate. How you choose to cook and store is up to you, as is the result because you made that decision.
Here's how to do it:
* Trim as much fat and sinew from the meat as possible.
* Slice the meat along the grain into thin strips. About 2 - 3 mm is best, but up to 5 mm is OK. Too thick and it will take too long to dry out and be incredibly hard to chew, too thin and it will be like leathery, dried carpaccio.
* Mix up your marinade of choice. It's entirely up to you what you want in it.
* Marinade for at least one day, up to three days, in the fridge.
* Dry in the oven at 80C until done (four to six hours, maybe longer). If you have a food dehydrator you can use that - just follow the manufacturer's instructions.
OK - basics out of the way - here's the Indonesian style beef jerky recipe for you.
Why Indonesian style? I like the flavours of Asia with Indonesia, Malaysia and Singapore being my top South East Asian favourites. There is something slightly more home-spun and comfort-food about it to me. I like good traditional Thai food and adore Cantonese food without reservation. Not the restaurant stuff we suffer out here - the real thing.
Let's cook!
What meat?
* Meat. 1.3 - 2 kg of lean looking corned silverside will do well for this recipe. Rump, scotch, rib-eye, whatever you like.
* Remove as much fat and sinew as possible.
* Slice along the grain into 2 - 3 mm thick slices.
* Put the sliced meat into a large container with a lid, ready to add the marinade.
 Meat sliced and ready to be marinated.
Here's what you need for the marinade:
* Two tablespoons of crunchy peanut butter
* 185 mls (3/4 cup) of Kecap Manis (Indonesian sweet soy sauce)
* 30 grams hot chilli powder
* 30 grams Korean red pepper powder
* 1 tablespoon of Lao Gan Ma chilli oil sauce, chicken flavour
* 1 tablespoon of Bumbu Daging Sate (Indonesian satay sauce)
* 2 tablespoons of Sambal Oelek (Indonesian chilli, garlic and shrimp sauce).
Here's a pic of the less common ingredients to make it easier for you to find those:

Optionally, you can add the following:
* 1 tablespoon of tamarind paste for some sourness
* 1 - 2 tablespoons of palm sugar for some warmth and depth to offset the chilli hotness a little. And here's what you do with all of those yummy ingredients:
* Mix all the ingredients in a saucepan over low heat until they're well combined
* Allow to cool off to room temperature.
* Spoon the marinade onto the meat slices in the container and then use your hands to squish the marinade among and into the meat, making sure each piece is coated.
* Put the lid on the container and put it into the fridge.
* Marination time for this recipe is around 24 hours, but up to three days won't hurt it.
 Marinade in the saucepan, cooling down.
 Marinated silverside ready for drying in the oven.
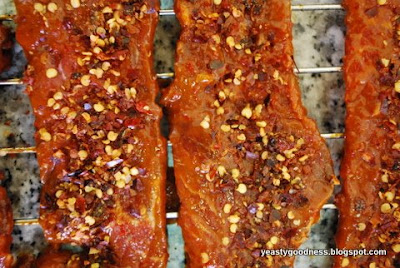 Sprinkle some dried chilli on top before drying to give it a little more kick.
And here's how to cook it:
* Pre-heat your oven so that it's stable at 80C. If you use a digital thermometer like the cheap one from Ikea, it makes it easier to accurately set your oven. It's better to allow the oven to pre-heat for 30 - 45 minutes so that the temperature is very stable. YMMV.
* Put the marinated meat onto the wire racks.
* Cook at 80C for four to six hours. Leave the oven closed at least until four hours have passed, then check quickly every so often until the jerky has reached your preferred level of doneness. Opening the oven gets rid of the moisture, but it also crashes the temperature. As with everything in life, balance brings good results.
* Allow it to cool off for about half an hour or so, package it for storage or start eating!
Enjoy!
PS. I must give credit to Paul Mercurio for the basis for this recipe. He participates in a forum where I am also a member. He posted a recipe for a pork jerky which I tried and didn't find to be exciting enough for my palate. I borrowed from his recipe and adjusted it to be spicier, richer and more flavoursome.
Told you I would be back later today! 
Here's a recipe for a really simple Linseed and Oat White Bread loaf. It's quite quick and easy and costs less than a loaf of commercial bread and best of all it tastes better. I use a Braun Combimax 600 to do most of the hard work, but you can do it by hand. Doing it by hand gives you the chance to make the loaf slightly more rustic, however, I'm a lazy bloke who wants his bread faster.
This will take about ten to twelve minutes of actual work. The rest of the time can be spent doing something else useful, like having a home brew beer.
While plain white bread is pretty much a staple of every household in the western world, I like grains not only for their often touted health benefits such as fibre for the digestive tract and lowering of cholesterol but also because they feel good to eat.
Here's what you need to do it:
* 500 grams plain white flour
* 1 packet of yeast
* 1 heaped teaspoon of baking powder
* 1 heaped teaspoon of salt
* 1 heaped teaspoon of sugar
* 2 tablespoons of linseeds (more if you like)
* 2 tablespoons of rolled oats
* 1.5 - 1.75 cups of slightly warm water
* 1 tablespoon olive oil
N.B. There are some explanations about the ingredients below if you're new to making bread. If you're already a bake-meister, you know what you're doing. I'm only including explanations once in the blog. Only new tips, tricks and traps will be explained in future editions, so don't worry, most post aren't going to be so long as this one.
And here's how you do it:
* Put the dough hook / arm into your food processor and put it on your scales
* Measure out 500 grams of flour, add the yeast, salt, sugar and linseed straight into the vessel.

* Mount the vessel back onto your food processor. Let it run for a couple of minutes at a nice low speed so that all the dry ingredients mix well.

* Add the olive oil and let it mix through well, just like when you combined the dry ingredients.

* Add the water a little at a time. You'll see the dough consistency begin to change.

* Keep adding it until the dough 'balls up'.
* Add a little more so that the dough is wettish and sticky.

* Splash some olive oil in a bowl and...

* Roll the dough ball in the oil so that it's lightly covered all over. Cut a few slashes into the dough ball as it will help speed up the proofing. Cover with cling wrap (Glad Wrap, Saran Wrap or similar) and put in a warm, draught-free place to proof rise for about 45 minutes to an hour or so.

* After the dough has doubled in size, maybe even more, it's time to punch it down.

* Punch the dough down while it's still in the bowl. Go on - punch it. Gently - just knock the air out of it.


* Turn the dough out onto a floured board, toss the oats all over it and...

* Knead the dough so that the oats are well distributed throughout the dough. Form it into a suitable shape for your loaf pan.

* Put the dough into the pre-greased pan. I grease with a thin coat of olive oil. You might need to press it outwards a little to stretch the dough to fit your pan.

* Cover it loosely with cling wrap and put it back in that warm and draught free place again for about 30 minutes or until the dough has risen to be about one centimetre above the lip of the loaf pan.

* Slash the risen dough again to assist the rise.

* If you want to decorate the loaf with more grains, now is the time to do it. Spray a little water on the top of the loaf, sprinkle your grains and press very lightly as you don't want to knock the loaf down again. Drizzle a little olive oil on top. This will help it brown nicely.

* Preheat the oven to 190C fan-forced and cook for 20 minutes or until the top is golden brown. Et voila!

* Put the loaf onto a cooling rack for about thirty minutes or so to cool out and lose any residual moisture. Store it as you like, but I prefer to wrap it in a clean linen tea-towel and leave it in a cool place on the kitchen bench. It will be supremely fresh and tasty for a couple of days and makes excellent toast after that.

And those explanations I mentioned above:
Ingredients
* Olive oil
I choose olive oil because it is reputedly healthier than other kinds. Canola is said to cause macular degeneration, other kinds are linked to other ailments including diabetes. It's up to you what kind you would like to use.
The oil is added to the dry flour so that it combines better. This aids in keeping the loaf moist and helps keep it fresh and moist longer. Adding the oil after the water doesn't work as well.
* Water
The water needs to be a little warm because that helps the yeast grow, making carbon dioxide bubbles and making your bread fluffy. Somewhere around 25C - 35C is pretty good. Too hot and you will kill the yeast, too cold and the yeast won't wake up leaving you with a thick and unpleasant loaf.
* Baking Powder
You say "You already used yeast. Why add baking powder?" It's because it gives a little more lift to the loaf, an improved rise. If you're making plain white bread then it's not very necessary unless you're trying to make perfect fluffy white bread like a Vietnamese baker. When you're using whole grains, they tend to weigh the loaf down a little and cause it not to rise fully and evenly. The little cheat of some baking powder (not baking soda) will fix this.
Method
* Vessel and dough hook / dough arm before adding ingredients
This makes sure that the dry ingredients aren't caught between the spindle and the dough arm. Less mess, easier clean-up.
* Adding water slowly
Unlike pulling a dough together on a bench-top or a board, things happen faster in a machine. Sometimes too fast. If you add the first cup of water quickly that's OK. You want to put the second three-quarters in slowly so that you don't end up with a wet, sticky lump of dough whirling around inside your machine stuck to the spindle and not being kneaded. As you add the water, the dough will begin to form and be kneaded properly. Keep adding water a little at a time until almost all of the loose bits on the bottom of the vessel are caught up in the dough. Stop at that point and let the machine knead a lovely loaf for you.
Also, different flours take up water at different rates. Different species of wheat, different country, different anything can change this critical point. If you find that you've added too much water, just add more flour in small quantities until the dough picks up and forms a dough ball in your machine. Once you've seen it happen and tried it, it will make much more sense.
* Oiling the dough ball
This is so that the dough doesn't dry out while it's rising.
* Proofing
This first rise can be made easier and faster with two cheats:
* Slash the dough just like in the pictures. It gives more surface area for the dough to rise rapidly.
* While you're adding water to the flour, turn your oven up high (>200C) for just a couple of minutes. It will make a nice warm place for the dough to rise quickly and help the yeast do their good work. Not too hot or you will be cooking the dough and have a less pleasing result.
* Why add the oats after knocking down?
If you add the oats with the other dry ingredients then they begin to take up water very quickly. While it doesn't always happen with normal rolled oats, it can mean that the dough ends up dry and tough by the end of the first rising / proofing. If you use instant or quick cook oats I can almost guarantee it will happen.
* Kneading
The kneading after knock-down needs to be gentle but firm. As Jamie Oliver explained his old master in Italy told him, "Do it gently, like making love to a very beautiful woman." Sexist but true. Gentle, long, smooth and fluid movements kneading with one hand will make a great result for you. If you use your weaker hand you will find this easier.
* Spraying water on the risen dough when adding grains
It makes the grains stick to the loaf better. A light spray, sprinkle grains, another light spray and then a drizzle of olive oil.
* Cooling Rack
This is so that the loaf can cool out properly. If it is left in the pan, it will sweat and become soggy and unpleasant.
I'll be back with more bread recipes that anyone can do, that are quick and tasty and most of all reasonably health conscious.
Happy baking!
W00t! First post!
I'm known by a few names online but for the sake of sanity you can just call me Fermented. I'm known by that name in a few places and it's probably the most appropriate one for this place, after all, it is about Yeasty Goodness. The name attached to this blog is Technomage as that's my alternate identity for tech related stuff. You can check out my tech blog at another location. Check the sidebar.
I've had a few blogs over the years, none of them with any commercial intent and neither really is this one. None of those were much more than a temporary online diary which bored even me to tears. Some of the things said in those were just, well, crap.
To be frank, I'm not sure if this one is going to be much better. However, I will persevere and maybe it might at least amuse someone or attract the occasional flaming.
What's this one about? Yeasty Goodness! You see, I'm a hobbyist brewer and baker. I'm into some other stuff and I will post that here as I go merely for the sake of a little variety.
"What's in it for me?" I hear you ask? "Plenty!" I tells ya. :) Everything I make and do that's mentioned on this blog will also have the recipe and pictures posted so that you can try it too.
I've become disillusioned with many online recipe resources. A lot of the USA based ones use too much sugar in baked goods, some others from elsewhere leave out one or more critical ingredients so that the result is bland and terrible, others overcomplicate their method or bill of ingredients for no real gain other than making the poster / baker / brewer feel good that they used twenty ingredients instead of six. You know what I mean?
Thus, I've taken it upon myself to post the amended receipes of others, new and original recipes and variations on favourites. My food palate tends to be mostly Asian and my brewing and baking palate tends more to English and Belgian. Now you know what to expect.
It's Sunday and the sun is well up and shattering my eyeballs, so it's time for another espresso to go bake some bread and brew another batch of ale. And I'll post it for you later today.
Cheers - Fermented.


 Specialty grains draining in a strainer.
 Close up of spent grain.
 Dough after proofing.
 Decorated loaf before baking.
 Done!
Done! Lovely colour, tastes great.


